The Helix Toolkit is one of the easiest ways I've found to quickly add 3D features to a WPF Application.
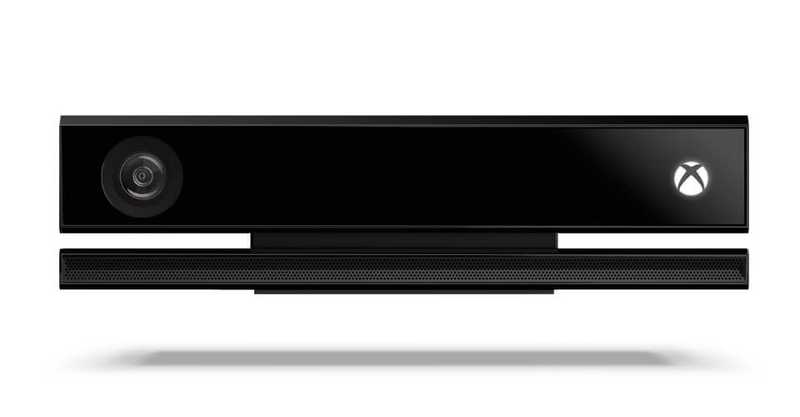
KinectV2 (Kinect for XBox One) is a motion capture device designed for gaming. It comes with a free SDK making it super easy to build KinectV2 apps for windows. In just a few lines of code you get access to the various streams captured by the KinectV2 sensor.
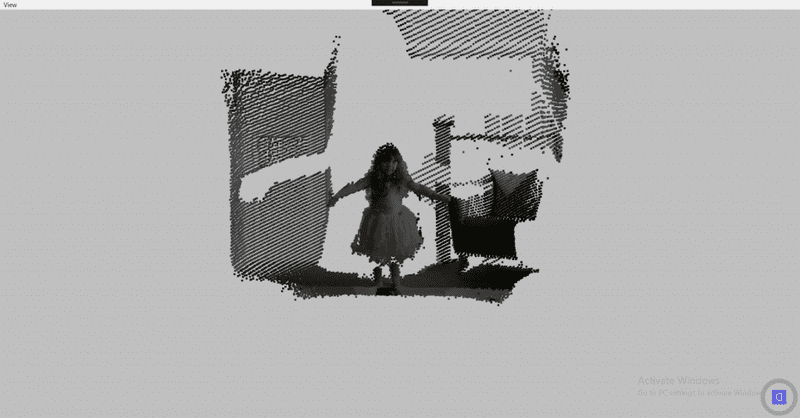
In this Article I'll be demonstrating a simple way of showing a 3D color depth map inside a WPF application using the HelixToolkit along with the Microsoft SDK for KinectV2.
The depth map will be rendered using the X, Y, Z coordinates from the KinectV2 depth camera stream and the coloured using a texture generated from the RGB camera stream.
The image below shows the output from the program capturing a fairy that lives with me and shows up from time to time.
The code for this article is available for download on github here.
Dependencies
We'll be using three main dependencies from Nuget for the sample:
- Galasoft.MVVMLight - Used to create ViewModels for our views. All of our interactions with Kinect 2 will be within this class.
- HelixToolkit.WPF - Provides 3D model and rendering features. In this sample we'll be using the HelixViewport3D and PointsVisual3D classes.
- Microsoft.Kinect - The Kinect for Windows 2 SDK
In order to run the sample on windows you will need to purchase a Kinect for XBox One sensor and adapter to allow it to be used on Windows. Click the images below to pick them up from Amazon.com
Kinect for Xbox One Sensor
Kinect for Xbox One Adapter
Application Architecture
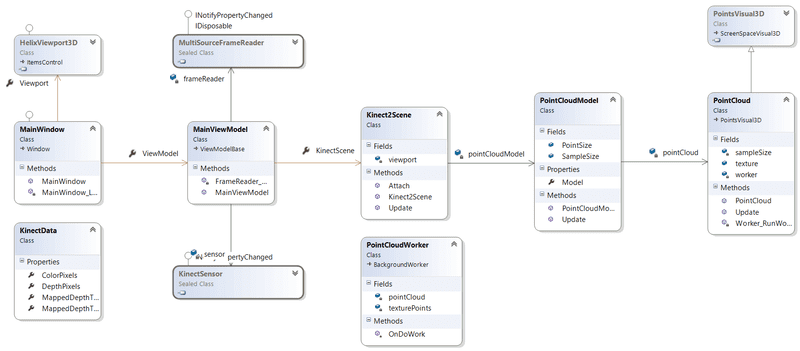
The following diagram shows the structure of the application.
 Class structure for the sample
- The MainWindow hosts a HelixViewport3D which will display our PointCloudModel.
- The MainWindow's ViewModel has a reference to the Kinect 2 Sensor and handles events to update our PointCloud model.
- The PointCloud model is a subclass of the Helix PointsVisual3D class.
- To avoid expensive operations on the UI thread, the PointCloud is updated on a separate thread via a PointCloudWorker, a custom subclass of the BackgroundWorker class.
- Depth and Colour frame data is communicated between the PointCloudWorker and MainViewModel via the KinectData class.
The Viewport
The MainWindows hosts a DockPanel. The HelixViewport3D is the lastchild control so will fill the window. I've added a View menu bound to some of the viewport controls for convenience. The snippet below shows how easy it is to add a 3D viewport to the window.
<helix:HelixViewport3D HorizontalAlignment="Stretch"
   VerticalAlignment="Stretch"
        Background="Silver"
        x:Name="mainViewport"
        CameraRotationMode="Turnball">

        <helix:HelixViewport3D.DefaultCamera>
            <PerspectiveCamera
                Position="0, 0, -2"
                LookDirection="0, 0, 1"
                UpDirection="0, 1, 0" />
            </helix:HelixViewport3D.DefaultCamera>

        <helix:DefaultLights/>

</helix:HelixViewport3D>
We are using a Perspective Camera positioned 2 meters behind Kinect, 0,0,0 is the Kinect sensor origin.
We are also looking in the same direction that Kinect is looking, which is +Z in CameraSpace. We've also set the up direction to be +Y in Kinect CameraSpace.
Finally, we will use a default set of lights for the scene.
To display our model in the viewport, MainWindow attaches to the KinectScene class exposed by its ViewModel. Note I have exposed the ViewModel and Viewport as properties of MainWindow for convenience.
public MainWindow()
{
    InitializeComponent();
    this.Loaded += MainWindow_Loaded;
}

private void MainWindow_Loaded(object sender, RoutedEventArgs e)
{
   // attach the kinect scene to the viewport to display it
   this.ViewModel.KinectScene.Attach(this.Viewport);
}
Interacting With Kinect
Inside the MainViewModel we are interacting with KinectV2. We initialize Kinect to send us events for Depth and Colour frames. We then handle MultiSourceFrameArrived events and update our KinectScene with data from Kinect.
An important point in the code is that we are using the CopyFrameDataToIntPtr functions to acquire the Kinect frame data for processing. These versions of the procedures outperform the versions that don't use an IntPtr since they are manipulating memory buffers directly.
Also note that we are using a utility class to map the frame data to the coordinate spaces we need for rendering the depth map.
First the Depth frame is mapped to Camera space so that we can position the points in 3D with respect to the Kinect sensors coordinate space.
Second the Depth frame is mapped to colour space which will give us the location of RGB pixels that correspond to the Depth frame positions, allowing us to colour the depth map appropriately.
At the end of the event handler, we pass the Kinect frame data to our scene to update the point cloud.
public MainViewModel()
{
   // initialize the scene with the kinect coordinate mapper
   this.KinectScene = new Kinect2Scene();

   // create the Kinect sensor
   this.sensor = KinectSensor.GetDefault();

   // We'll be creating a colour 3D depth map, so listen for color and depth frames
   this.frameReader = this.sensor.OpenMultiSourceFrameReader(FrameSourceTypes.Depth | FrameSourceTypes.Color);

   // handle events from Kinect
   this.frameReader.MultiSourceFrameArrived += FrameReader_MultiSourceFrameArrived;

   this.sensor.Open();
}

private void FrameReader_MultiSourceFrameArrived(object sender, MultiSourceFrameArrivedEventArgs e)
{
   var frame = e.FrameReference.AcquireFrame();

   if (frame == null) return;

   var colorFrame = frame.ColorFrameReference.AcquireFrame();
   var depthFrame = frame.DepthFrameReference.AcquireFrame();

   ...

   var pinnedDepthArray = System.Runtime.InteropServices.GCHandle.Alloc(kinectData.DepthPixels, System.Runtime.InteropServices.GCHandleType.Pinned);

   try
   {
       IntPtr depthPointer = pinnedDepthArray.AddrOfPinnedObject();
       depthFrame.CopyFrameDataToIntPtr(depthPointer, (uint)Kinect2Metrics.DepthBufferLength);
    }
    finally
    {
       pinnedDepthArray.Free();
    }

    // map the depth pixels to CameraSpace for 3D rendering
    MapperUtils.MapDepthFrameToCameraSpace(this.sensor.CoordinateMapper, kinectData);

    // map color pixels to depth space so we can color the depth map
    MapperUtils.MapDepthFrameToColorSpace(this.sensor.CoordinateMapper, kinectData);

   // update the scene using the kinect data
   this.KinectScene.Update(kinectData);

   ...
}
The PointCloud Model
The PointCloudModel is a simple class that exposes a ModelVisual3D. It also controls the SampleSize (how many pixels from the depth map we will use) and the point size for the 3D depth map.
The PointCloud class is created and added as a child Visual3D of the model.
Finally the Update() function passed the KinectData to the PointCloud to that it can update itself.
public class PointCloudModel
{
        // for performance reasons we will not use every depth map point
        public static readonly int SampleSize = 10;

        // controls the size of the point cloud points
        public static readonly int PointSize = 4;

        PointCloud pointCloud;

        // expose the point cloud externally
        public ModelVisual3D Model { get; set; }


        public PointCloudModel()
        {
            // initialize the point cloud
            this.pointCloud = new PointCloud(SampleSize);
            this.pointCloud.Size = PointSize;

            // add the point cloud to the model
            this.Model = new ModelVisual3D();
            this.Model.Children.Add(this.pointCloud);
        }

        public void Update(KinectData data)
        {
            // update the point cloud using kinect data
            this.pointCloud.Update(data);
        }
}
The PointCloud class has two main components, the texture, which is a WriteableBitmap, and the PointCloudWorker.
public class PointCloud : PointsVisual3D
{
        // The RGB texture taken from the colour stream
        public WriteableBitmap texture;

        // a background worker to update the point cloud as data arrives
        PointCloudWorker worker;

        ...
}
In the constructor for the class we initialize the texture, setting the model material to be an ImageBrush that uses the texture.
We also add a ScaleTransform3D to the model. This renders the model as the KinectV2 sees it. If we don't do this the model would be reversed on screen.
Finally we initialize the PointCloudWorker class that does the grunt work.
 public PointCloud(int sampleSize)
 {
            this.sampleSize = sampleSize;

            // initialize the texture to the size of the RGB frame
            this.texture = new WriteableBitmap(Kinect2Metrics.RGBFrameWidth, Kinect2Metrics.RGBFrameHeight, Kinect2Metrics.DPI, Kinect2Metrics.DPI, PixelFormats.Bgr32, null);

            // setup the texture brush to colour the point cloud using the RGB image
            var materialBrush = new ImageBrush(this.texture)
            {
                ViewportUnits = BrushMappingMode.Absolute,
                Viewport = new System.Windows.Rect(0, 0, this.texture.Width, this.texture.Height),
                AlignmentX = AlignmentX.Left,
                AlignmentY = AlignmentY.Top,
                Stretch = Stretch.None,
                TileMode = TileMode.Tile
            };

            this.Model.Material = new DiffuseMaterial(materialBrush);

            // reverse the model on the x axis so we see what Kinect sees
            this.Model.Transform = new ScaleTransform3D(-1, 1, 1);

            worker = new PointCloudWorker(this.sampleSize);
            worker.RunWorkerCompleted += Worker_RunWorkerCompleted;
}
In the Update method, we ask the PointCloudWorker to update the PointCloud if its not busy. Depending on performance this may mean that we don't update the cloud for every Kinect frame we recieve.
public void Update(KinectData data)
{
            // if the worker is still updating, just bail
            // note: this may add some update delay depending on system performance
            if (this.worker.IsBusy) return;

            // send the data to the worker
            var workerArgs = new CloudWorkerArgs
            {
                Data = data
            };

            this.worker.RunWorkerAsync(workerArgs);
}
When the PointCloudWorker completes its job, we replace the points in the PointsVisual3D with the new points generated by the Worker, and update the texture with the latest RGB pixels. We also set the TextureCoordinates in the Mesh to those created by the worker.
private void Worker_RunWorkerCompleted(object sender, RunWorkerCompletedEventArgs e)
        {
            // get the result from the worker and update our model
            // We will just replace the texturecoordinates and points with the results from the worker
            var workerResult = e.Result as CloudWorkerResult;

            this.Mesh.TextureCoordinates = new PointCollection(workerResult.TexturePoints);
            this.Points = new Point3DCollection(workerResult.PointCloud);
            this.texture.WritePixels(
                                  new Int32Rect(0, 0, Kinect2Metrics.RGBFrameWidth, Kinect2Metrics.RGBFrameHeight),
                                  workerResult.Data.ColorPixels,
                                  Kinect2Metrics.ColorStride,
                                  0);
}
The PointCloudWorker
This is where we do the grunt work.
In the constructor we create a set of indexes that are used to sample the depth map and update the pointcloud and texture vertices arrays.
The KinectData is passed as part of the event args to OnDoWork. We use a Parallel.For loop to update the point cloud asynchronously and efficiently.
Note that for the texture vertices we need four points (two triangles). We want each cloud point to take on the colour of the single pixel in the RGB texture, so each vertex points to the same point in the texture.
Finally, we update the point cloud X,Y and Z coordinates, taking care that of -Infinities (in fact if we include -Infinities in the point positions, the model will not render at all).
When we are done we set the resulting point cloud in the DoWorkEventArgs.Result property.
public class PointCloudWorker : BackgroundWorker
{
        Point[] texturePoints;
        Point3D[] pointCloud;
        private int[] pointIndexes;

        public PointCloudWorker(int sampleSize)
        {
            // select a set of indexes based on the sample size
            this.pointIndexes = Enumerable.Range(0, Kinect2Metrics.DepthFrameWidth * Kinect2Metrics.DepthFrameHeight)
                .Where(i => i % sampleSize == 0).ToArray();

            // initialize the arrays of points with empty data
            this.texturePoints = this.pointIndexes.SelectMany(i => Enumerable.Repeat(new Point(), 4)).ToArray();
            this.pointCloud = this.pointIndexes.Select(i => new Point3D()).ToArray();
        }

        protected override void OnDoWork(DoWorkEventArgs e)
        {
            // if we have no depth data, just bail here
            var args = e.Argument as CloudWorkerArgs;
            var data = args.Data;

            // update the texture coordinates and points in parallel
            Parallel.For(0, this.pointIndexes.Count(), (i) =>
            {
                var j = this.pointIndexes[i];

                // update texture coordinates, we need four vertices per point in the cloud
                // however, all texture coordiates can point to the same RGB pixel so the
                // point assumes that colour

                var colorPoint = data.MappedDepthToColorPixels[j];

                var k = i * 4; //there are 4 texture vertices per cloud point

                this.texturePoints[k].X = float.IsNegativeInfinity(colorPoint.X) ? 0 : colorPoint.X;
                this.texturePoints[k].Y = float.IsNegativeInfinity(colorPoint.Y) ? 0 : colorPoint.Y;
                this.texturePoints[k + 1].X = float.IsNegativeInfinity(colorPoint.X) ? 0 : colorPoint.X;
                this.texturePoints[k + 1].Y = float.IsNegativeInfinity(colorPoint.Y) ? 0 : colorPoint.Y;
                this.texturePoints[k + 2].X = float.IsNegativeInfinity(colorPoint.X) ? 0 : colorPoint.X;
                this.texturePoints[k + 2].Y = float.IsNegativeInfinity(colorPoint.Y) ? 0 : colorPoint.Y;
                this.texturePoints[k + 3].X = float.IsNegativeInfinity(colorPoint.X) ? 0 : colorPoint.X;
                this.texturePoints[k + 3].Y = float.IsNegativeInfinity(colorPoint.Y) ? 0 : colorPoint.Y;

                // update the 3D positions in the point cloud
                var cloudPoint = data.MappedDepthToCameraSpacePixels[j];

                if (!float.IsNegativeInfinity(cloudPoint.X))
                {
                    this.pointCloud[i].X = cloudPoint.X;
                    this.pointCloud[i].Y = cloudPoint.Y;
                    this.pointCloud[i].Z = cloudPoint.Z;
                }
            });

            // return the result
            var workerResult = new CloudWorkerResult
            {
                Data = data,
                TexturePoints = this.texturePoints,
                PointCloud = this.pointCloud
            };

            e.Result = workerResult;

            base.OnDoWork(e);
        }
}
Program Output
Here is a set of images of the back of my office. The first picture is front on, the second is an isometric view. The HelixViewport3D allows you to rotate the view by right-clicking and moving the mouse.
For performance reasons in the code I have sampled every 10 pixels from the depth map. The sampling amount can be adjusted in the PointCloudModel class.
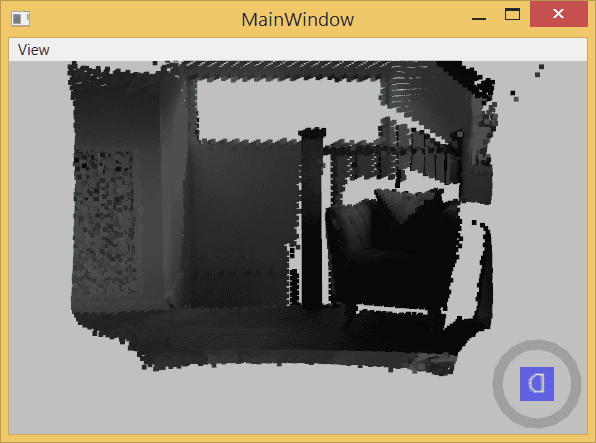
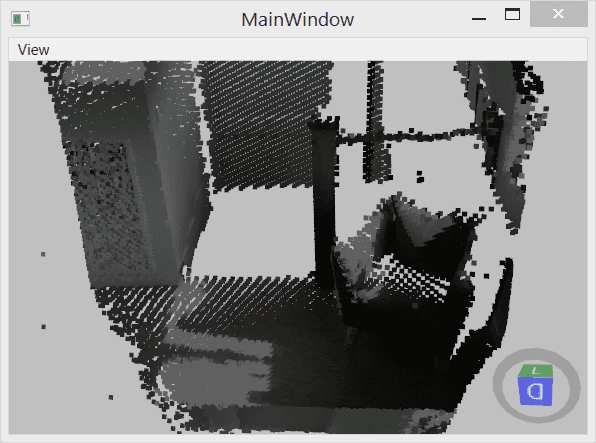
And that's it!, we have a nice and simple 3D rendering of what Kinect can see.
If you want to know more about programming with the Kinect SDK, Read the docs or pick up this book on Amazon.com.
Kinect for Xbox One Sensor
Kinect for Xbox One Adapter


