Overview
We have a number of individual micro-services and want to have a continuous delivery system with an on demand deployment to various internal and external environments.
After using codeship for a while we decided to use Jenkins CI to implement our pipeline to give us a little more control. Furthermore, to reduce costs we have containerized all of our services using Docker and deployed to Amazon EC2 container service, moving away from an Elastic Beanstalk deployment model with 40 instances, to three ECS clusters with just six instances.
In this article I’ll go through the entire pipeline and point out some of the key patterns that have enabled us to do this.
Sample source code for the article can be found here: https://github.com/ginocoates/pipeline-samples
Caveats/Points to Note
- For now we have opted for continuous delivery (on-demand) over continuous deployment. This is because we need to control what features go to each environment so that we don’t impact integrators adversely.
- Database deployments are handled separately. We have a policy of making DB deployments backwards compatible and we rollout DB changes and smoke test them before rolling out corresponding application code.
Tools Used
- Jenkins CI - Open source automation server.
- Jenkinsfile - All pipelines have been implemented using the Pipeline plugin with the Jenkins file pulled from source control.
- Terraform - Allows you to define your infrastructure as code using a json like syntax. We used terraform to define our entire ECS cluster, including cluster, cluster instances, application load balancer, target groups, security groups, ecs services and task definitions for each of our services.
- Custom Orchestration Tools - Some custom scripts written in bash to drive the other tools.
Environments
We have a number of environments in use as Doshii for different purposes. The goal of our pipeline is to promote a set of container images through these different environments on demand.
- Test - This is an on-demand ECS cluster that is created as needed and destroyed by a Jenkins scheduled job each evening at 8PM to save costs.
- Beta - Functionality that has passed system testing in the test environment will be promoted to the Beta environment on demand. This is also the environment that most of our integration clients use for their integration development.
- Staging - Where we test containers with live credentials before deploying to the live cluster. This environment is hitting the live database.
- Live and Sandbox - Live and Live like environments. Some customers are sandboxed in a live like environment while they are onboarded.
Jenkins Setup
Jenkins is running as a docker container on a small instance. This is fronted by a load balancer to simplify SSL termination. The Jenkins servers are tucked away inside a VPC private subnet with individual security groups and network ACL’s in place.
The figure below shows the basic architecture of the jenkins servers.
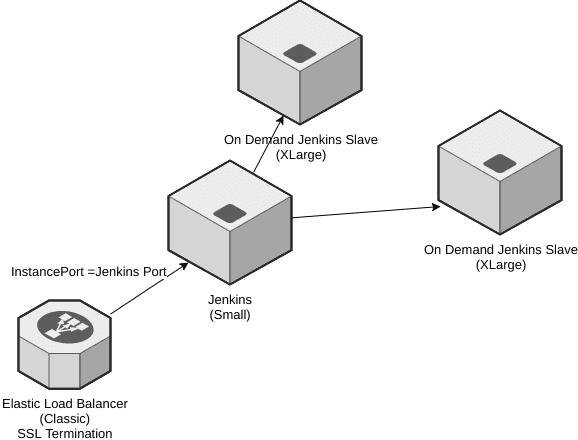
To fire up more beefy slaves on demand we use the Amazon EC2 plugin. The slaves will created as needed and will be terminated after the idle timeout.
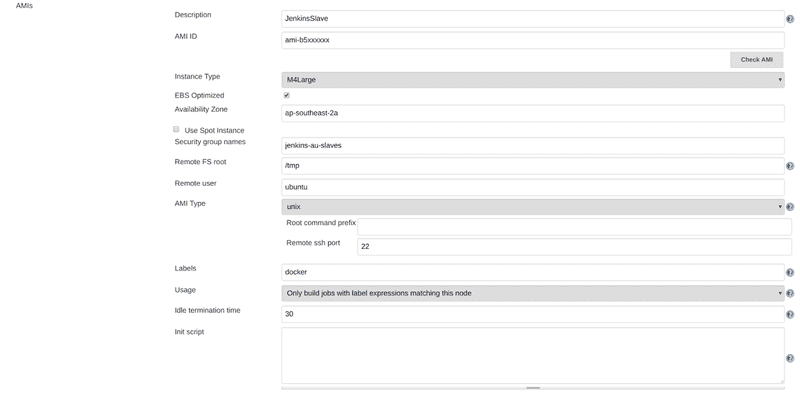
In the AWS EC2 plugin you can configure a lot of details about your slave, including the AMI ID to use, the instance size and security group details.
 ]
]
We use a custom built AMI, built using Hashicorp’s Packer, which includes all the tools and utilities we need to perform our build. Pre packing the ami in this way shaves time of your build process, otherwise you’d have to install dependencies every time a slave is created.
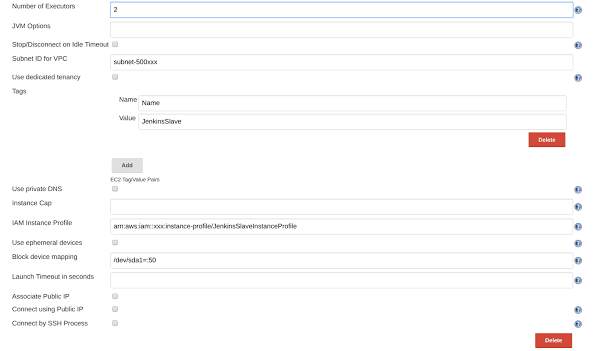
You can also set the number of jobs you would like to allow on the instance. Best approach is to limit this to the number of processors on the machine (e.g. 2 for an M4.Large instance).
 ]
]
You can also configure things like the instance profile to use for your instance. Ensure that the instance profile has adequate permissions to execute the build tasks that will be run on the instance, especially if your build interacts with AWS resources in any way.
Importing Upstream Builds
In Jenkins we are using the Extensible Choice Plugin to create list of upstream builds to deploy. This plugin allows you to specify a groovy script to build the choice list. For example, to import builds from the deploy-test job, we used the following script in an Extensible Choice parameter.
import jenkins.model.Jenkins
import hudson.model.AbstractProject
import hudson.model.Result
import hudson.util.RunList

def builds = \[\];
RunList<?> runs = Jenkins.instance.getItem("deploy-test").getBuilds().overThresholdOnly(Result.SUCCESS).limit(100)
runs.each { it ->
 builds.add("${it.number}-${it.displayName}")
}

return builds
As a convenience we set the the display name of a build to be the git commit message if the build is successful. This is then visible in the Extensible Choice parameter and helps with traceability of changes deployed throughout the Jenkins pipeline. This can be achieved with a simple groovy script to get the commit message from git. e.g.
def setDisplayName(){
 def comment = sh (script: "git log -1 --no-merges --format=%B", returnStdout: true,)
 comment = comment.trim();
 currentBuild.displayName = comment;
}
Pipeline Overview
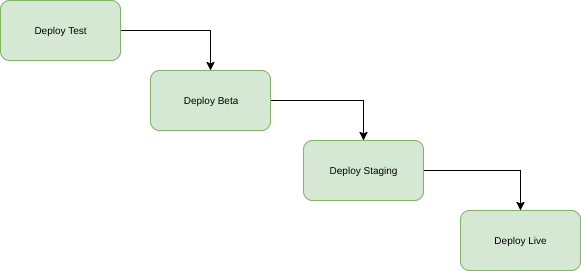
In general our deployments go through a number of stages. Individual services are built and tested on check-in. We deploy the latest docker images to Test on demand, perform system testing and then promote those images through the different environments.
 ]
]
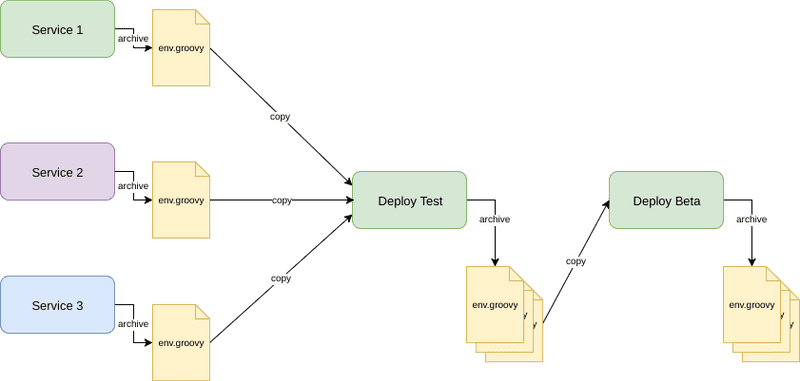
Each of our microservices have a separate job in Jenkins, which uses ‘docker build’ to create the container image. If tests pass we tag the image with the build number and push this to EC2 container registry.
If the build is successful we will also create an artifact groovy file that records the tag of the container image we published to ECR. For example, for service1 the output file for build 90 would contain:
env.SERVICE1_BUILD=90
The idea behind this artifact is that it’s imported by the downstream deployment project. The groovy file is loaded and the environment variable thats created is used to set the image tag to deploy for that service (more on that later).
If the deployment is successful, we re-archive the env.groovy files in the deployment build so that they can be referenced in downstream deployments.
The image below gives an overview of how the deployment pipeline works:
 ]
]
We use the Copy Artifact plugin to copy the artifacts across to the deployment build. The code to copy the last successful build within a pipeline is quite simple. The snippet below copies the env file for the target service to the import directory of the deployment build.
 $class: 'CopyArtifact',
 projectName: 'service1-build',
 filter: 'output/service-1.env.groovy',
 fingerprintArtifacts: true,
 target: 'import',
 flatten: true,
 selector: \[$class: 'StatusBuildSelector', stable: false\]\]);
Sample pipeline scripts can be found here:https://github.com/ginocoates/pipeline-samples/tree/master/jenkins/pipeline
Orchestration
We’ve created a simple tool for orchestration using terraform. This tool wraps terraform in a docker container and sets up some conventions allow terraform to be used more consistently on local and in Jenkins (ripped from an idea by an awesome DevOps I know, Vinny Carneiro).
The tool uses the following folder conventions to manage terraform source code:
Orchestration Root Folder
- config - variable and terraform state config for deployed stacks
- region - A regional stack deployment - e.g. ap-southeast-2
- stack-name
- tf-config.tf - Configure backend state for terraform
- variables.tf-vars - A set of variables for this stack instance
- stack-name
- region - A regional stack deployment - e.g. ap-southeast-2
- src
- stack-name - A set of terraform files for a stack
- modules - Reusable terraform modules
For example our source folders for ecs clusters are structured as follows:
Orchestration Root Folder
- config
- ap-southeast-2
- appcluster-test
- tf-config.tf
- variables.tf-vars
- appcluster-beta
- tf-config.tf
- variables.tf-vars
- appcluster-test
- ap-southeast-2
- src
- appcluster-test
- main.tf
- appcluster-beta
- main.tf
- modules
- app-cluster
- main.tf
- app-cluster
- appcluster-test
These conventions allows us to independently control features of our cluster for each environment, via the variables.tfvars file in the config folder.
To run the orchestration tool we pass in the source folder name and the region as follows.
./orchestrate [tf cmd] [stack-name] [region]
e.g.
./orchestrate apply appcluster-test ap-southeast-2
The tool will use a docker volume to set the source code context to the appropriate stack folder and load the configuration from the corresponding config folder.
Note: To use this tool in Jenkins the slave instance profile has been given adequate permissions to manage our ECS resources using terraform.
Sample source code for our ECS cluster can be found here: https://github.com/ginocoates/pipeline-samples/tree/master/terraform
Deploying to ECS using Terraform
To deploy to ECS using terraform we use a aws_ecs_taskdefinition resource which is rendered using the service.build variable, as follows:
data "template\file" "service1-task-definition" {
 template = "${file("${path.module}/task-definition.tpl")}"
 vars {
 BUILD = "${var.service1-build}"
 container-image="service1"
 container="service1"
 }
}

resource "aws\ecs\task\definition" "service1" {
 family                = "ecs-service-service1-${var.environment-name}"
 container_definitions = "${data.template\file.service1-task-definition.rendered}"
 task_role_arn = "${var.task-role-arn}"
}
To deploy a specific build of a service we can override these variables at the command line when calling the orchestrate tool.
In Jenkins, we first load the upstream groovy files to create the environment variable, then pass the environment variables to the orchestrate tool, as follows:
// load upstream build artifacts to set environment variables appropriately
load "import/service1.env.groovy"
load "import/service2.env.groovy"

// initialize the state
sh './orchestrate init appcluster-test ap-southeast-2'

// run the deployment, specifying the tags to use in the task definition.
sh "./orchestrate apply appcluster-test ap-southeast-2 \\
-var service1-build=${env.SERVICE1\_BUILD} \\
-var service2-build=${env.SERVICE2\_BUILD}
Under the hood, this will generate a new task definition in ECS and issue an Update command to the service. ECS will then schedule any new tasks as required.
Staging and Blue Green deployments
For blue green deployments we considered creating a whole new staging cluster on demand, smoke testing this, then perform a DNS switch when we want to roll this new cluster out to live. However, we didn’t like this approach because it means that there may be some lost requests as the DNS switch occurs, and some possible downtime for our clients.
Instead we decided to break live deployments into two steps. The first step is to stage our containers against the live environment and ensure they are operational. This creates a staging ECS cluster on demand, configured against a different DNS where we can smoke test our service containers in a live environment before releasing them to the wild.
The second step is the live deployment. Since our terraform based deployment updates the service with a new task definition, we just tell ECS to deploy the images we have previously staged. ECS takes care of scheduling the new tasks,routing new requests to these tasks, while bleeding connections from the old tasks before killing them. This results in zero downtime for our clients.